|
|
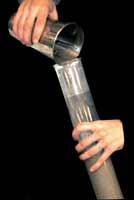
Figure 8. Place
dispersed sample into sedimentation cylinder.
|
1. After the 60 second dispersion, place the contents of the dispersion cup into the sedimentation cylinder (Figure 8). Be sure to rinse off the cup and paddles of the dispersion apparatus completely in order to obtain the entire sample.
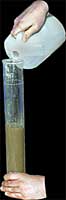
2. Add distilled water to the sample in the sedimentation cylinder (Figure 9).
Make sure that the temperature of the distilled water and sample are regulated at the test temperature, 20 degrees C (68 degrees F).
|
|
|
Figure 9. Add distilled water to the sample.
|
This can be accomplished by controlling the temperature of the test room or using a constant temperature bath. Deviations from 20 degrees C (68 degrees F) can be compensated for but should not be so great as to make readings suspect with large correction factors.
|
|
Figure 10. Adding water to the calibration mark.
|
Add enough water so that the final volume of the specimen and the solution is 1 liter. Take care in adding water to the mark as the cylinder fills up. It is a good idea to use an eyedropper in order to achieve the proper height in the sedimentation cylinder (Figure 10).
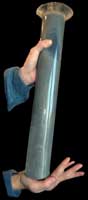
3. Once the proper volume of the sample with solution is obtained, agitate the cylinder by
|
|
|
Figure 11. Agitating the slurry in the sedimentation cylinder.
|
covering one end with the palm of one hand (or use a rubber stopper) and turn the cylinder upside down and back for a perdiod of 60 seconds to agitate the slurry. Note 5 in AASHTO T 88 indicates that the number of turns during 60 seconds should be approximately 60, counting the turn upside down and back as two turns (Figure 11). Any soils remaining in the bottom of the cylinder during the first few turns should be loosened by vigorous shaking of the cylinder while it is in the inverted position.